

Movavi vs CapCut for Beginners: Which Is Easier to Learn?

Movavi Video Editor
  • Trim, cut, crop, and rotate videos
  • Add titles, stickers, and transitions
  • Apply visual effects

By clicking the download button, you're downloading a free version of the program.*

Edited by
Ben Jacklin
11,847

Movavi vs CapCut comes down to where you edit and what you post. CapCut is fast for trend-driven vertical clips, and its desktop tools feel familiar if you started on a phone. Movavi Video Editor is a CapCut alternative built around the computer: it suits a first vlog, a channel intro, or a longer video made from phone footage.

This comparison is for bloggers planning a first vlog or channel intro, for creators weighing a move from phone to computer, and for families turning trip footage into one watchable video. We compare both editors on what matters when you pick a video editor for beginners: interface, learning, templates, AI tools, result quality, and platforms.

Movavi vs CapCut for beginners

Criterion

Movavi Video Editor

CapCut

Best for

Lifestyle vlogs, channel intros, longer horizontal videos

Short, trending vertical clips for TikTok, Reels, and Shorts

Interface

Hover previews, effects dragged onto the timeline

Desktop tools mirror the mobile app

Learning

Movavi Ideas: free, a new tutorial every week

No built-in hub; community tutorials on TikTok and YouTube

Templates

Blocks you reorder, add, or delete; editing, music, transitions, and text pre-set

Trending, vertical-focused templates; applied as a whole, with little customization

AI tools

One-click tools, no AI credit system

Broad AI toolkit, available with AI credits

Auto subtitles

Recognition in 100+ languages, 60+ designs, word-by-word highlighting

AI subtitles, translation, a choice of styles

Background removal

AI removes the background behind a person, no green screen

AI removes the background behind a person, no green screen

Platforms

Desktop app: Windows 10 and 11 (64-bit), macOS 12.0 or higher

Mobile, web, and desktop

Free version

You can use all features and effects, but exports are limited: 60-second cap, 1080p quality, watermark in the corner of the video

Only basic editing tools. AI features and premium assets are locked behind a paywall

Starting price

Full version for $19.95/month

Pro version on desktop is $19.99/month

Interface and first steps

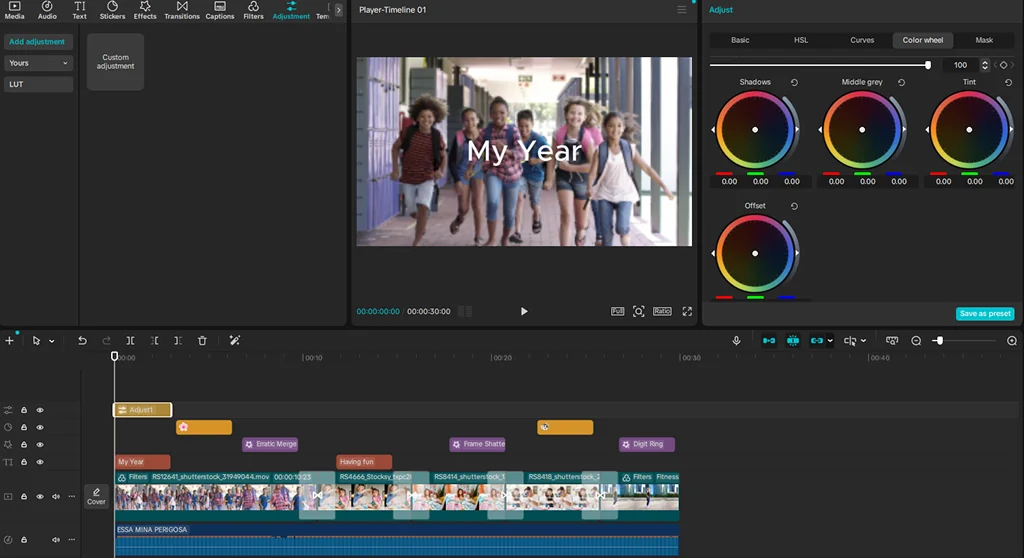
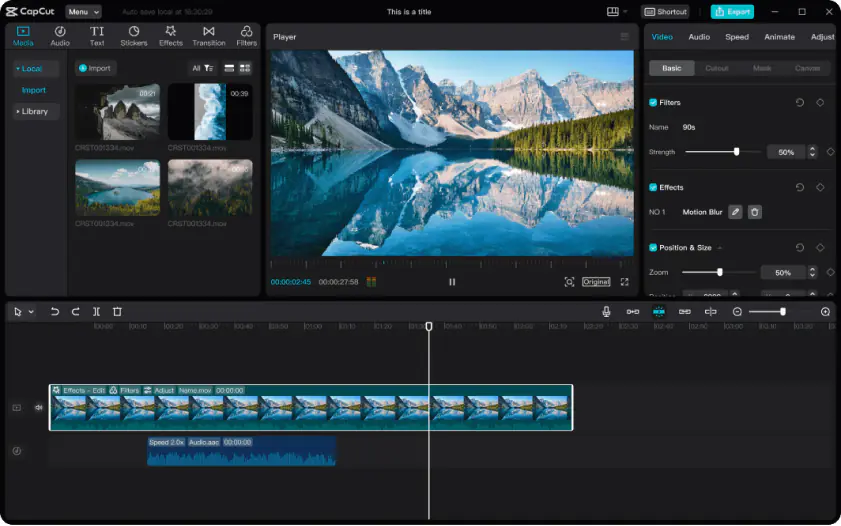
Many beginners already know CapCut from the mobile app, and that counts for something. On a computer, its tools mirror the phone version, so the first minutes feel familiar. The trade-off is volume: the sheer number of tools and fine-tuning settings can slow learning, and a launcher screen comes before the editor itself.

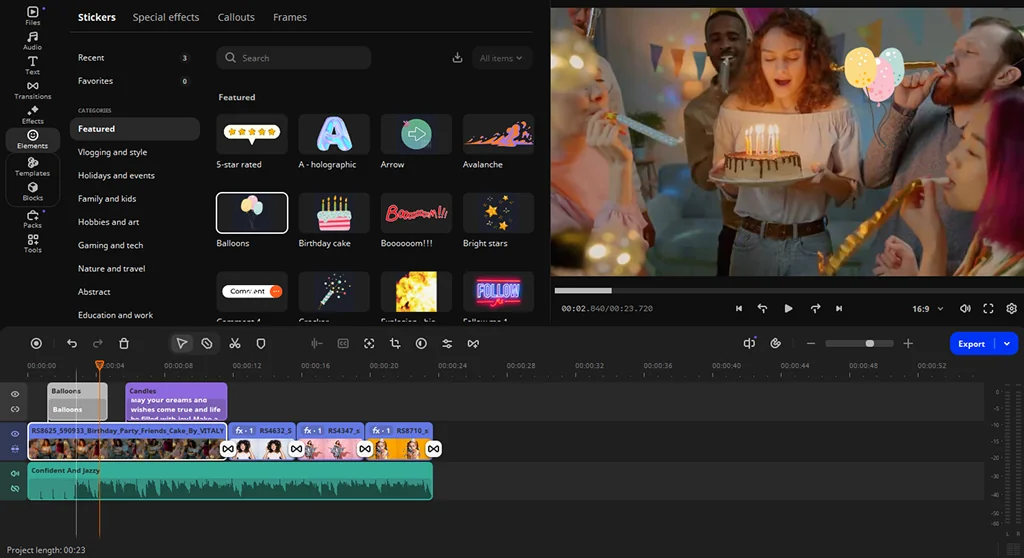
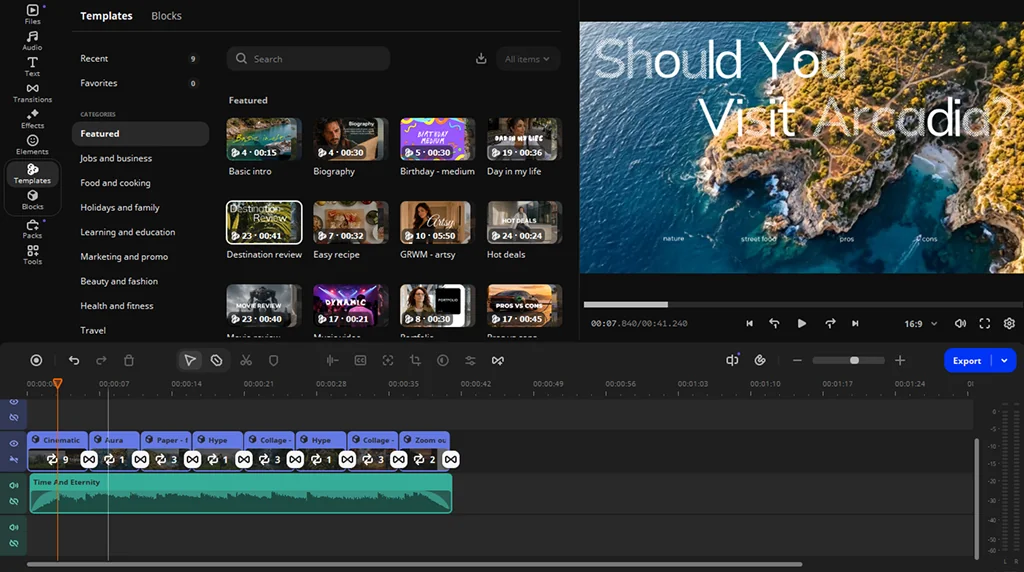
Movavi Video Editor shows you the result before you commit to it. Move the cursor over a file or along the timeline, and a preview appears for the clip, effect, transition, or exact frame. Effects and presets go on by drag and drop: grab one, drop it onto the clip on the timeline. The layout can’t be customized, so the screen stays the same from project to project.

Better for: CapCut if the mobile app is already your editor; Movavi Video Editor for a first edit on a computer.

Movavi Video Editor interface

Movavi Video Editor

CapCut Desktop interface

CapCut Desktop

Learning: Movavi Ideas vs the CapCut tutorial scene

Learning comes down to who writes the lesson plan. Movavi Ideas is a free tutorial hub with new editing ideas every week, and each one comes with a step-by-step tutorial that takes less than a minute to follow. The ideas cover vlogs, short vertical clips, holidays, family videos, memes, and business videos.

CapCut has no built-in hub of this kind. You’ll find a CapCut tutorial for almost any effect on TikTok and YouTube, made by the community, and that pool is big. What’s missing is a weekly set of ideas curated inside the app, so you choose your own lessons.

Beginner video editing software works best when the lesson sits next to the tool. Pick one tutorial, follow it start to finish, then repeat it with your own footage. That loop takes you from watching to doing, no course required.

Better for: guided learning, Movavi Ideas; looking up one specific effect by name, the community tutorials around CapCut.

Movavi Ideas

Templates: customizable Blocks vs trending clips

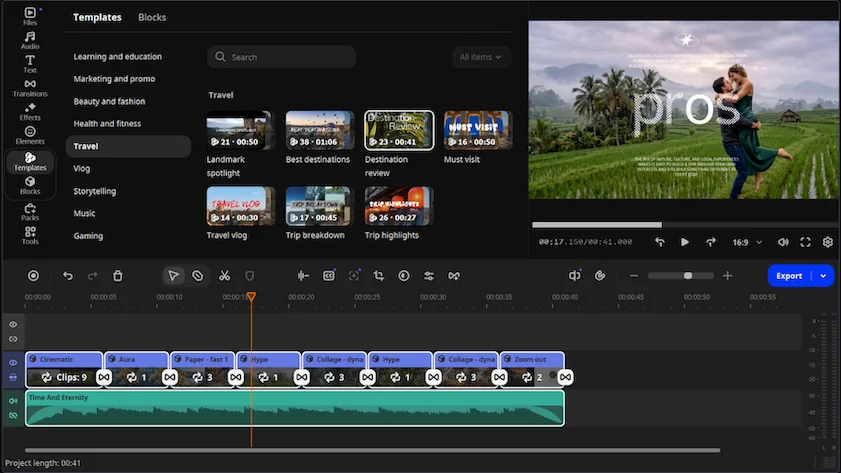
Movavi Video Templates is a multi-style library of customizable, pro-looking, modular templates for any kind of video. A Movavi template is a ready-made project built from Blocks, and you fill the Blocks with your own clips and photos. Nothing is locked: reorder, add, delete, or swap Blocks, retype the text, or build a whole video from Blocks alone. Several templates come with the full version at no extra cost; the whole collection is available with an additional subscription to Movavi Templates.

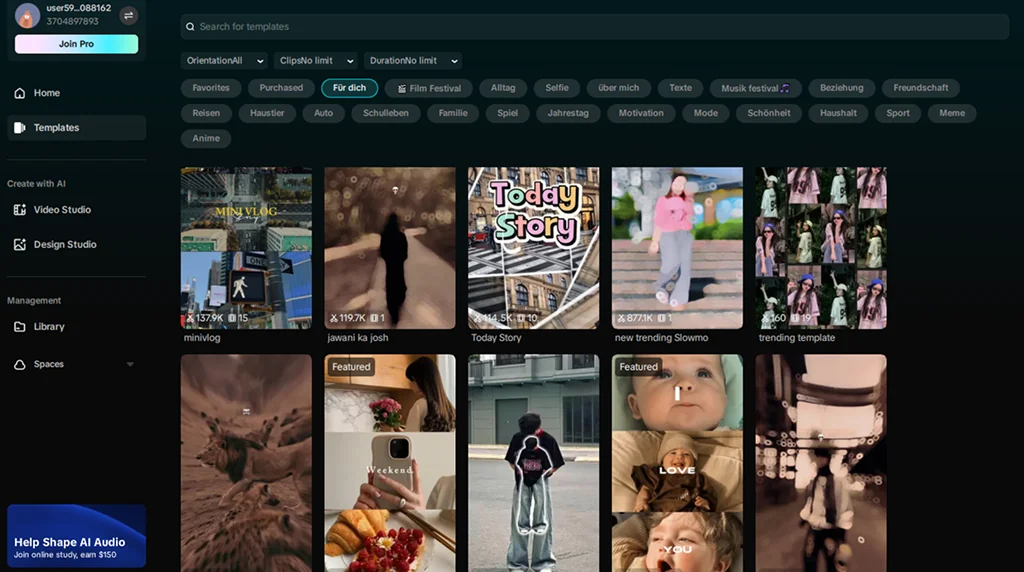
CapCut leans into trends. Its library of templates and effects is huge and built around vertical clips. They’re applied as a whole and leave little room for customization, and the best ones sit behind a subscription. That suits a clip that follows a trend, since the format is the point.

Better for: CapCut for a trend-driven vertical clip; Movavi Video Editor for a vlog or intro you want to rearrange Block by Block.

Movavi Video Templates

Movavi Video Templates

Templates in CapCut Desktop

Templates in CapCut Desktop

AI tools: credits vs one-click

Both editors offer AI help; they differ in size and billing. CapCut’s toolkit is broad: camera tracking, relighting, retouching, AI voiceover, background replacement, and prompt-based AI editing, all on AI credits. Movavi’s one-click tools cover the routine jobs: auto subtitles, video and audio noise removal, silence removal, auto-crop with subject tracking, and motion tracking. There is no credit system, so nothing to count.

Auto-captions are the overlap. Both editors generate them with AI. Movavi calls them auto subtitles and recognizes 100+ languages, with word-by-word highlighting that follows the audio in real time.

For clean sound, Movavi’s AI audio noise removal clears traffic, wind, and steady hums in one click, and AI video denoise cleans grain from low-light clips. CapCut removes audio noise too, but has no video grain removal. Both remove the background behind a person with AI, no green screen needed.

Better for: Movavi Video Editor if you want AI without counting credits; CapCut for heavier jobs like relighting or camera tracking.

Result quality

Movavi helps you achieve a pro-looking result even on your first try. Each Movavi template arrives with pre-set editing, music, transitions, and titles, so you only need to swap the clips with your own footage and edit the text.

Color follows the same logic. Movavi improves a clip with ready-made color presets, then lets you fine-tune tone, contrast, and saturation by hand. CapCut leans on precise settings and can change the lighting with AI. Titles, transitions, filters, stickers, and music are in both editors, and so is stabilization.

Movavi is designed for beginners and everyday creators, so many tools are applied with one click or drag-and-drop. If you want to adjust every parameter by hand, CapCut’s fine-tuning settings go further.

Better for: Movavi Video Editor for polish with few settings to touch; CapCut for hands-on fine-tuning.

Platforms: where each editor runs

CapCut runs on mobile, web, and desktop, and it is tied to TikTok. Some features and assets need an internet connection and an account, and reviewers mention that not everything carries over from phone to computer.

Movavi Video Editor is a desktop app for PC and Mac. It has no web version and no cloud integration. It imports MP4, MOV, AVI, MKV, and WMV video, and it can upload straight to YouTube, Vimeo, Google Drive, or TikTok.

Better for: CapCut if you edit across phone, browser, and computer; Movavi Video Editor for a computer-based workflow with longer horizontal videos.

Movavi Video Editor and CapCut at a glance

  • Best for

    first vlogs, channel intros, and longer videos edited on a Windows or Mac computer.

A first vlog goes faster when the assembly is already done. Movavi Video Editor is an intuitive video editor with customizable video templates, one-click AI tools, and hundreds of drag-and-drop effects. It is a desktop app for Windows and macOS, interface tooltips explain each tool while you use it, and a template from the Vlog category does the assembly for you.

Key features:

  • Modular templates: each one is a ready-made project of Blocks that you open with a double-click on the timeline.
  • AI subtitles with word-by-word highlighting: choose the screen position and font style while the current word follows the audio.
  • Auto-tracked cropping: converts horizontal footage to vertical and keeps the speaker or product centered.
  • Auto-silence removal: finds pauses in the audio track, with adjustable pause length and volume threshold.
  • Movavi Effects: an optional subscription that adds 1,500+ music tracks for every mood.
Pros:
  • Frame-accurate cuts with the Blade tool, plus pre-timeline trimming of long source files

  • Video speed up to 100x for time-lapses of drives, walks, or builds

  • Hundreds of built-in drag-and-drop effects with copyright-free music and sounds

  • Fast Track HD acceleration for faster processing of HD footage

Cons:
  • Lacks advanced, detailed controls for a professional workflow

  • No flexible UI customization

  • No web version or cloud integration

CapCut

  • Best for

    short, trending vertical clips for TikTok, Reels, and Shorts.

CapCut is the editor many beginners already know from their phone, and it is tied to TikTok. Its pull is a large library of creator templates and a broad AI toolkit.

Key features:

  • Trending templates and effects: a large library built around vertical clips.
  • Keyframe animation and chroma key: for editing beyond a simple cut.
  • Speed ramping: customizable presets for slowing down and speeding up footage.
  • AI toolkit: camera tracking, relighting, retouching, AI voiceover, and background replacement.
Pros:
  • Fast, simple editing for short vertical videos, with a low barrier to entry

  • Auto subtitles, subject-tracked cropping, and automatic pause removal

  • A huge library of trending templates and effects

Cons:
  • The best templates and effects are marked Pro and need a subscription

  • Not everything carries over from phone to computer

  • AI features run on a credit system

  • The number of tools and settings can slow learning

Use cases: which editor for which video

Your first vlog

The task: turn a day of phone clips, like a daily routine or a weekend trip, into a first vlog. Click Add Files to bring the clips in, open the Templates tab, choose a template from the Vlog category, then drop it onto the timeline. Double-click a Block to swap in your own clip, then retype the Block text. The template has done the assembly, so the first export starts from a finished structure.

Pick: Movavi Video Editor.

A channel intro

The task: a short opener that plays before every upload. The routine is the same as for the vlog: drop the Basic intro template onto the timeline and fill its Blocks with your footage, photos, and text.

Pick: Movavi Video Editor.

A short clip for TikTok

CapCut is the more convenient tool here. It is tied to TikTok and has templates built for vertical video, so a trend-driven unboxing teaser starts from a format made for it. Movavi Video Editor can make the clip too: auto-tracked cropping turns horizontal footage into vertical while keeping the speaker or product centered, and direct upload sends the result to TikTok.

Pick: CapCut for a trend format; Movavi Video Editor when the vertical clip is cut from a longer horizontal video.

Moving from your phone to a computer

Staying in CapCut is reasonable, since its desktop tools mirror the mobile app. Longer horizontal projects are where Movavi Video Editor fits best.

Pick: keep CapCut for quick clips; move to Movavi Video Editor for longer horizontal videos.

What reviewers say

Movavi Video Editor. Reviewers on Reddit and review sites mention the simple interface first: you can start editing without watching tutorials. They also point to good value for the price, a program that doesn’t overload low-end PCs, and a large library of effects, titles, and licensed music already in the base version. The recurring complaints are about licensing. The free version limits exports, some effects and music need an add-on subscription on top of the main license, and activation and payment can feel confusing because the program and the add-on content are licensed separately.

Capterra rating: 4.8

G2 rating: 4.6

CapCut. Reviewers on the same sites call the barrier to entry minimal. They praise its AI tools and its library of trending templates and effects for TikTok, Reels, and Shorts. The recurring complaints: effects and templates that used to be free are now marked Pro and need a subscription, some features exist on mobile but not on desktop, and a few users have questions about how face and voice data are used.

ProductHunt raring: 4.3

Which is the easiest video editor for your task?

  • A first vlog on a computer: Movavi Video Editor, starting from the Vlog category.
  • A channel intro: Movavi Video Editor, with the Intro video template.
  • A trend-driven vertical clip for TikTok: CapCut.
  • A longer horizontal video from trip footage: Movavi Video Editor.
  • Phone-first editing with the occasional computer session: CapCut desktop.

The rule of thumb for choosing the easiest video editor: on a computer with a horizontal video, start with Movavi Video Editor; on a phone with a vertical clip, start with CapCut.

Your clips are already sitting in your camera roll, and all they’re missing is a timeline. Install Movavi Video Editor, bring in one real clip with Add Files, and try a template from the Vlog category. If a short vertical clip is next on your list, CapCut is a good place to make that one.

Movavi Video Editor
Create awesome videos easily

*The free version of Movavi Video Editor may have the following restrictions depending on the build: watermark on exported clips, 60-second video or 1/2 audio length limit, and/or some advanced features unavailable when exporting videos.

Frequently asked questions

Which video editor for beginners is easier to learn: CapCut or Movavi?

It depends on the device. CapCut is easier to pick up on a phone for short vertical clips; Movavi Video Editor is easier on a computer. A first cut in Movavi takes the Blade tool, which makes instant cuts on the timeline, and pre-timeline trimming pulls a short segment out of a long file before it reaches the project.

How to learn video editing quickly?

Learn one tool at a time: cutting first, then music, then titles. Movavi Ideas keeps each lesson short, and the ideas are sorted by theme and format, so you can start with the kind of video you want to make.

Can you edit video with no experience?

Yes. Beginners also get a safety net: if Movavi Video Editor closes unexpectedly, autosave recovery brings the project back.

Is Movavi a good CapCut alternative for beginners?

Yes, if you edit on a computer. Movavi Video Editor imports MP4, MOV, AVI, MKV, and WMV video, so common video files can go straight onto the timeline. If you edit on a phone, CapCut remains the more natural fit.

Does CapCut have a desktop version?

Yes. CapCut desktop sits alongside the mobile and web versions, and its tools mirror the phone app. Some features and assets require an internet connection and an account.

Have questions?
If you can’t find the answer to your question, please feel free to contact our Support Team.
Join us for discounts, editing tips, and content ideas

1.5M+ users already subscribed to our newsletter

By signing up, I agree to receive marketing emails from Movavi and agree to Movavi's Privacy Policy.